
步骤1: _客户端通过发送Client Hello报文开始SSL通信。报文中包含客户端支持的SSL的指定版本、加密组件(Cipher Suite)列表(所使用的加密算法及密钥长度等)。
步骤2: _服务器可进行SSL通信时,会以Server Hello报文作为应答。和客户端一样,在报文中包含SSL版本以及加密组件。服务器的加密组件内容是从接收到的客户端加密组件内筛选出来的。
步骤3: _之后服务器发送Certificate报文。报文中包含公开密钥证书。
步骤4:  最后服务器发送Server Hello Done报文通知客户端,最初阶段的SSL握手协商部分结束。
步骤5:  SSL第一次握手结束之后,客户端以Client Key Exchange报文作为回应。报文中包含通信加密中使用的一种被称为Pre-master secret的随机密码串。该报文已用步骤3中的公开密钥进行加密。
步骤6:  接着客户端继续发送Change Cipher Spec报文。该报文会提示服务器,在此报文之后的通信会采用Pre-master secret密钥加密。
步骤7:  客户端发送Finished报文。该报文包含连接至今全部报文的整体校验值。这次握手协商是否能够成功,要以服务器是否能够正确解密该报文作为判定标准。
步骤8:  服务器同样发送Change Cipher Spec报文。
步骤9: 服务器同样发送Finished报文。
步骤10:  服务器和客户端的Finished报文交换完毕之后,SSL连接就算建立完成。当然,通信会受到SSL的保护。从此处开始进行应用层协议的通信,即发送HTTP请求。
步骤11: 应用层协议通信,即发送HTTP响应。
步骤12: 最后由客户端断开连接。断开连接时,发送close_notify报文。上图做了一些省略,这步之后再发送TCP FIN报文来关闭与TCP的通信。
3.通过Nginx实现https协议访问网站: 3.1:安装Nginx:
[root@hfnginx ~]# wget http://nginx.org/download/nginx-1.8.1.tar.gz
[root@hfnginx ~]# tar  xvf nginx-1.8.1.tar.gz
[root@hfnginx ~]# cd nginx-1.8.1
[root@hfnginx -1.8.1]# ./configure --prefix=/usr/local/nginx --sbin-path=/usr/local/nginx/sbin/nginx --conf-path=/usr/local/nginx/conf/nginx.conf --error-log-path=/var/log/nginx/error.log --http-log-path=/var/log/nginx/access.log --pid-path=/var/run/nginx/nginx.pid --lock-path=/var/lock/nginx.lock --user=nginx --group=nginx --with-http_ssl_module --with-http_stub_status_module --with-http_gzip_static_module --http-client-body-temp-path=/var/tmp/nginx/client/ --http-proxy-temp-path=/var/tmp/nginx/proxy/ --http-fastcgi-temp-path=/var/tmp/nginx/fcgi/ --http-uwsgi-temp-path=/var/tmp/nginx/uwsgi --http-scgi-temp-path=/var/tmp/nginx/scgi --with-pcre && make && make install[root@hfnginx nginx-1.8.1]# useradd nginx -s /sbin/nologin
[root@hfnginx nginx-1.8.1]# mkdir /usr/local/nginx/sbin/nginx -pv
[root@hfnginx nginx-1.8.1]# mkdir -pv /var/tmp/nginx/client/
[root@hfnginx nginx-1.8.1]# /usr/local/nginx/sbin/nginx [root@hfnginx conf]# cd /usr/local/nginx/
[root@hfnginx nginx]# mkdir key
[root@hfnginx nginx]# cd key/
[root@hfnginx key]# openssl genrsa -out ca.key 2048
[root@hfnginx key]# openssl genrsa -des3 -out server.key 2048
Generating RSA private key, 2048 bit long modulus
........................................+++
................+++
e is 65537 (0x10001)
Enter pass phrase for server.key:
Verifying - Enter pass phrase for server.key:
[root@hfnginx key]# openssl req -new -key server.key -out server.csr #这是在nginx服务器执行,是生成一个像CA服务器申请签名证书的csr证书,CA服务器根据此csr证书发给一个签名的证书
Enter pass phrase for server.key:
You are about to be asked to enter information that will be incorporated
into your certificate request.
What you are about to enter is what is called a Distinguished Name or a DN.
There are quite a few fields but you can leave some blank
For some fields there will be a default value,
If you enter '.', the field will be left blank.
-----
Country Name (2 letter code) [XX]:China
string is too long, it needs to be less than 2 bytes long
Country Name (2 letter code) [XX]:CN
State or Province Name (full name) []:BeiJing
Locality Name (eg, city) [Default City]:Beijing
Organization Name (eg, company) [Default Company Ltd]:HFAW
Organizational Unit Name (eg, section) []:HFAW
Common Name (eg, your name or your server's hostname) []:hfnginx
Email Address []:zhangshijie@weathercn.com
Please enter the following 'extra' attributes
to be sent with your certificate request
A challenge password []:
An optional company name []: root@hfnginx key]# cp server.key server.key.bak
[root@hfnginx key]# openssl rsa -in server.key.bak -out server.key
Enter pass phrase for server.key.ori: #输入一次密码就行了
writing RSA key3.5:进行签名,会生成一个crt的证书
[root@hfnginx key]# openssl x509 -req -days 365 -in server.csr -signkey server.key -out server.crt

Signature ok
subject=/C=CN/ST=BeiJing/L=Beijing/O=HFAW/OU=HFAW/CN=hfnginx/emailAddress=zhangshijie@weathercn.com
Getting Private key
Enter pass phrase for server.key:

[root@hfnginx key]# ll

total 16
-rw-r--r--. 1 root root 1675 Jul  4 06:57 ca.key
-rw-r--r--. 1 root root 1302 Jul  4 07:09 server.crt
-rw-r--r--. 1 root root 1054 Jul  4 07:05 server.csr
-rw-r--r--. 1 root root 1743 Jul  4 07:01 server.key
3.6:配置Nginx:
upstream webserver {
	#ip_hash;
	server  192.168.0.201 weight=1 max_fails=2  fail_timeout=2;
	server  192.168.0.202 weight=1 max_fails=2  fail_timeout=2;
	#server 127.0.0.1:9008 backup;
}
server {
        listen       443 ssl;
        ssl_certificate      /usr/local/nginx/key/server.crt;
        ssl_certificate_key  /usr/local/nginx/key/server.key;
        server_name  hfnginx.chinacloudapp.cn;
        #access_log  logs/host.access.log  main;
        location / {
	    root   html;
	    index  index.html;
	}
	location ~* ^/login {  #当访问login页面的时候,就转发到后端服务器,后端有两台服务器
	    proxy_pass  http://webserver;
	    proxy_hide_header field;
	    #proxy_set_header X-Real-IP $remote_addr;
	}
}
3.7:配置两台后端Web服务器,最后会会实现负载访问的效果,当其中一台Web Server挂掉之后,还有一台可以访问:
3.7.1:Web Server1:
[root@Server1 ~]# yum install httpd
[root@Server1 ~]# cd /var/www/html/
[root@Server1 html]# mkdir login #和nginx的转发目录对应
[root@Server1 html]# echo "HTTPS Server1" > login/index.html
[root@Server1 html]# systemctl  restart httpd #我这是centos 7
3.7.2:Web Server2:
[root@Server2 ~]# yum install httpd
[root@Server2 ~]# cd /var/www/html/
[root@Server2 html]# mkdir login #和nginx的转发目录对应
[root@Server2 html]# echo "HTTPS Server2" > login/index.html
[root@Server2 html]# systemctl  restart httpd
3.8:访问web测试:
3.8.1:首次访问会提示链接不安全:

3.8.2:添加例外:

3.8.3:可以点高级查看证书信息:

3.8.4:查看证书常规信息:

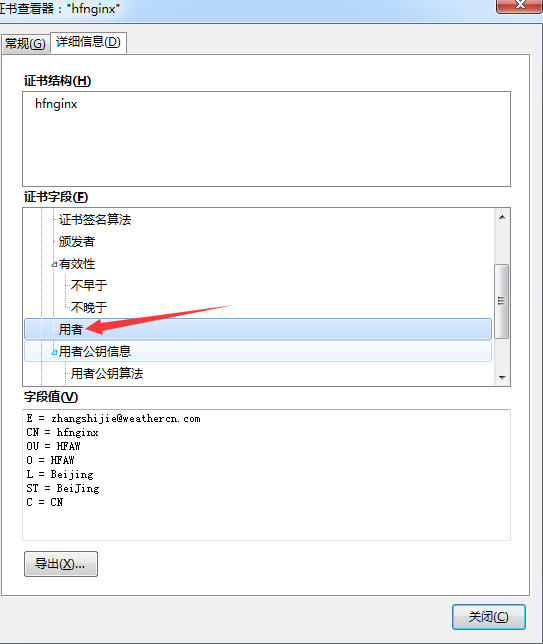
3.8.5:查看证书相信信息:

3.8.6:确认添加例外:


3.8.7:第一台服务器的页面:
3.8.8:刷新一下,会出现第二台服务器的页面:
